
Clearance (CL)
Build deep intuition for clearance and how it determines exposure, interpretation, and decisions.
Tip
What you’ll build today: a strong, decision-focused understanding of clearance as the primary driver of exposure.
Learning Objectives
By the end of this lesson, you will be able to:
- Define clearance in conceptual terms
- Explain how clearance controls exposure (AUC)
- Interpret changes in clearance across individuals
- Connect clearance to real dosing and decision-making
Key Ideas
Clearance describes the efficiency of drug removal from the body.
It is best understood as:
the volume of plasma cleared of drug per unit time
But more importantly:
Clearance determines exposure
The Core Relationship
\[ AUC = \frac{Dose}{CL} \]
This is one of the most important relationships in pharmacometrics.
Insight: For a fixed dose, exposure is inversely proportional to clearance.
Warning
If you misunderstand clearance, you will misinterpret exposure.
What Is Exposure (AUC)?
Exposure is often summarized using AUC, which stands for:
Area Under the Concentration–Time Curve
AUC measures the total drug exposure over time.
Visually:
- larger area → more total exposure
- smaller area → less total exposure
AUC does not depend only on dose.
It also depends strongly on clearance.
Worked Example: Same Dose, Different Clearance
Imagine two patients receive the same dose.
Only clearance differs.
Notice:
- both patients start similarly
- one profile stays elevated longer
- the total area underneath differs
That area is AUC.
Expanding the Example
Now imagine clearance doubles.
Keep one thing fixed:
- same dose
- same starting conditions
Only clearance changes.
Because dose stays constant:
- higher clearance → lower AUC
- lower clearance → higher AUC
Remember:
AUC = Area Under the Concentration–Time Curve
AUC summarizes total drug exposure over time.
\[ AUC = \frac{Dose}{CL} \]
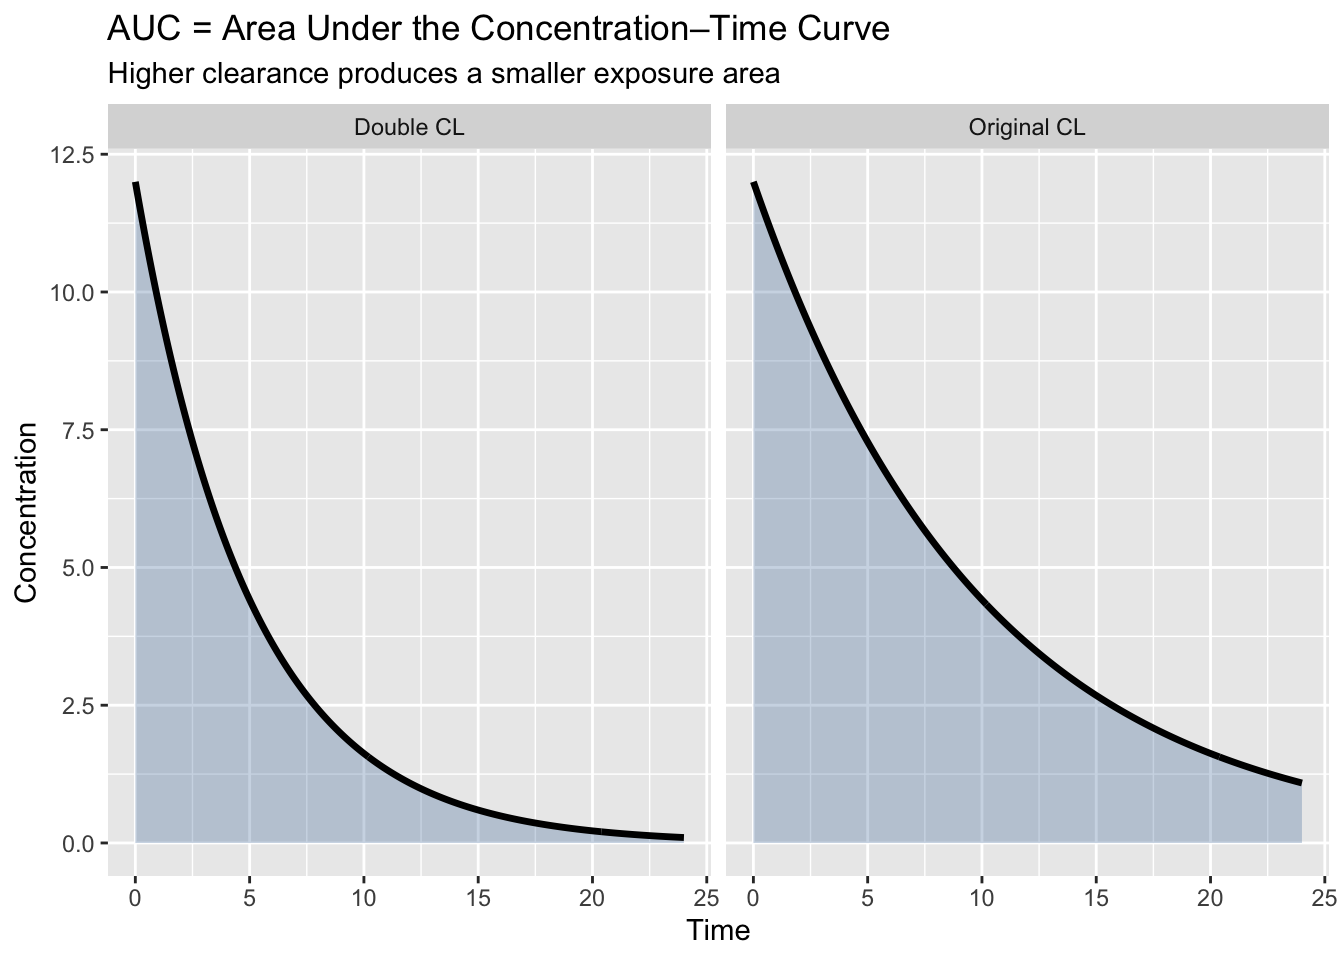
Compare the shaded regions.
The shaded area represents:
total exposure over time (AUC)
Notice:
- both patients receive the same dose
- the higher-clearance profile declines faster
- the shaded region becomes smaller
That means:
- less total exposure
- potentially reduced effect
- possible need for dose adjustment
Same dose.
Different clearance.
Different exposure.
Clinical Interpretation
Clearance variability explains:
- why patients respond differently
- why dose adjustments are needed
- why “one dose fits all” often fails
This is why clearance is central in:
- dose selection
- exposure-response analysis
- individualized therapy
Insight
A powerful way to think about clearance:
Clearance controls how efficiently the body removes drug over time
Note
Always ask: “Is exposure changing because of dose, or because of clearance?”
Strategies
- Focus on the elimination phase when interpreting clearance
- Compare clearance across subjects rather than relying on averages
- Use exposure (AUC) as a bridge between dose and clearance
- Always consider whether differences are dose-driven or CL-driven
Common Mistakes
- Confusing dose with exposure
- Ignoring variability in clearance
- Assuming same dose leads to same outcome
- Over-interpreting clearance when data are insufficient
Practice Problems
- If clearance increases, what happens to AUC (same dose)?
- Why can two patients with the same dose have different exposure?
- What does clearance represent conceptually?
TipStep-by-Step Solutions
- AUC decreases
- Because clearance differs between individuals
- The efficiency of drug removal from the body
Summary
Clearance is the primary driver of exposure.
- Higher CL → lower exposure
- Lower CL → higher exposure
Exposure is often summarized as AUC — the total area under the concentration–time curve.
Understanding clearance allows you to:
- interpret PK data
- explain variability
- make dosing decisions
TipQuick Tips
- CL controls AUC
- Same dose ≠ same exposure
- Always consider variability
- Think in terms of removal efficiency
- Link CL directly to decisions